

Organize
Mailboxes
The basic means of organizing email is through the use of mailboxes. MailMate supports 3 kinds of mailboxes which are described in the following subsections. For all mailbox types the following is useful to know:
-
You can change the displayed count of messages for a mailbox (unread, flagged, …). By default, most mailboxes inherit the type of count from the parent mailbox.
-
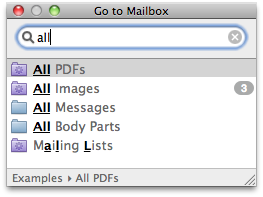
You can change the currently selected mailbox using “Go to Mailbox…” (⌘T). This opens a window listing all mailboxes. Advanced filtering is supported and your favorite abbreviations for mailboxes are cached. Without filtering, the list is sorted such that the most recently used mailbox is at the top. Holding down ⌥ when selecting a mailbox opens the mailbox editor. Holding down ⇧ opens a new window with the mailbox selected.
-
You can move selected messages to any (IMAP) mailbox using “Move to Mailbox…” (⌥⌘T). Again, filtering and abbreviations are supported.
Standard Mailboxes
The MAILBOXES section includes a set of standard mailboxes: “Inbox”, “Drafts”, “Sent Messages”, “Junk”, and “Deleted Messages”. They cannot be changed, because they have a standard purpose, as implied by their names. Each IMAP account may have only one mailbox of each type, although the actual name can vary from IMAP account to IMAP account. There is also a mailbox named “Archive” which is intended for archiving messages in a separate IMAP mailbox.
If you have multiple IMAP accounts configured, then these mailboxes are universal, that is they unify mailboxes of a given type across multiple IMAP accounts. It is possible to expand these mailboxes if one wants to see which messages are in which account.
The mailbox “All Messages” is a special mailbox which contains all messages in your IMAP accounts except those that are in the mailboxes used for deleted messages or junk. This means that it combines messages from “Inbox”, “Drafts”, “Sent”, “Archive”, and any additional IMAP mailboxes in your accounts. This mailbox is often set in smart mailboxes as the source mailbox.
Universal mailboxes can be used as targets for moving messages. MailMate will move the messages such that they each stay within their original IMAP account.
Note: The mailbox for “Sent Messages” has an additional level of mailboxes if an account has multiple addresses. One mailbox for each identity used as a from address.
Smart Mailboxes
MailMate encourages the use of so-called “smart” mailboxes. These are virtual mailboxes which show messages which belong to a specified set of mailboxes and which match some set of conditions. When handling a new message in the Inbox, the basic decision to make is whether it should be archived or trashed. The rest should be handled by smart mailboxes.
Below the universal mailboxes in the mailbox outline you find a range of smart mailboxes which exemplifies what is possible with MailMate. In particular, note the “Mailing Lists” mailbox: If you have any mailing list messages they are automatically divided into smart mailboxes as children of the “Mailing Lists” mailbox. You can see how this is configured in the “Submailboxes” pane of the mailbox editor.
Double-click any smart mailbox in order to see how it has been configured.
Mailbox Editor
When creating a new smart mailbox or when editing an existing mailbox, the mailbox editor is opened. The mailbox editor handles all mailbox related settings in a set of separate panes. For now, this only works for smart mailboxes, but it is planned to work for any kind of mailbox with a varying set of panes (depending on the type of mailbox).
Mailboxes and Conditions
The content of a smart mailbox is based on the content of one or more other mailboxes and an optional set of conditions (the “Mailboxes” and “Conditions” panes). If you hold down the option key (⌥) then the plus buttons will change into “…” buttons (a general feature of macOS). This can be used to create advanced any/all (boolean) constructions.
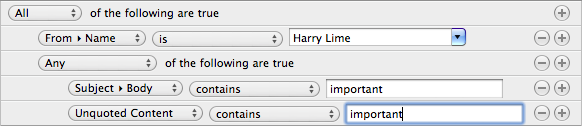
The most interesting part of the mailbox editor is the popup for choosing the headers used for filtering. The default set of headers is reminiscent of other email applications, but there are some important differences. Many of the headers in the menu have submenus providing more exact values for filtering. For example, instead of searching the entire “From” header for an email address, you can explicitly match the email address with “From ▸ Address”. Also note that when entering a value in the text field for a match, the value is automatically completed. Finally, if you try the “Other…” menu item then you get access to a full list of all headers seen in the imported messages.
Two special “headers” can be used to search in the body text of messages. One for unquoted body text and another for quoted body text.
The popup used to select the type of comparison is also interesting. Case sensitivity is an option and you can also choose to match on the headers in any body part of a message. Make sure you try selecting the “is in” type of comparison. This allows you to compare with the headers of messages in some other mailbox. For an example of this, try editing the “Examples ▸ Personal Inbox” mailbox.
Submailboxes
The “Submailboxes” pane has settings for:
- Automatically showing submailboxes based on a header of the messages in the mailbox. A format string can be specified for the automatic naming of these mailboxes.
- Automatically showing submailboxes for each account (like for the standard mailboxes such as the universal Inbox).
You can, for example, automatically display submailboxes dividing messages into subsets based on year, sender, mailing list, or any other (part of a) message header.
The submailboxes feature also works for headers with multiple values. In particular, recipient headers and tags. In other words, a message can appear in multiple submailboxes if it has multiple values.
Rules
You can add rules to any mailbox. Each rule is a set of conditions and a set of actions. Rules are only triggered when a message is added to a mailbox which most often happens when a new message arrives in an account. You can apply rules to the selected messages of a mailbox by using “Mailbox ▸ Apply Rules”.
Tags
Tagging is a simple concept, but it’s a very powerful tool when organizing your messages. You can use it to apply tags to your messages and then utilize the tags when searching and, in particular, when creating smart mailboxes.
MailMate offers two ways to create new tags. You can do it in the “Tags” preferences pane or you can do it by simply entering a new tag name in the tags editor. The tags editor is shown when you hit the shortcut key which is simply t by default (configurable in the preferences pane). A text field is shown and you can then enter and/or remove tags for the currently selected message. Changes are committed if you hit enter (↩) and cancelled if you hit the escape key. When entering tags they are automatically completed using the set of known tags. If you hit the space key then all available tags are shown in the completion popup.
When multiple messages are selected then the tags editor has two text fields; one for tags to be added and another for tags to be removed from the selected messages.
If the currently selected message has any tags then they are shown in the expanded headers view. Clicking on a tag searches for messages with the same tag. Holding down ⌥ searches the current mailbox only (like all other link searches). The tags are also available for searching and in smart mailbox conditions.
The text fields for adding/removing tags are great for keeping your hands on the keyboard, but MailMate also provides alternative ways to add/remove tags. There’s a “Tag” menu in the “Message” menu and in the context sensitive menu in the message list. You can also setup a tags toolbar button with multiple tag buttons for your most frequently used tags.
Note that the composer allows the user to assign tags to drafts as well. This is done by enabling the “Tags” header in the headers menu (⌃⌘H). You might also want to enable it by default using “Use as Default Headers” in the same menu.
Within any Tags text field the F5 key opens a popup menu with all available tags.
IMAP Keywords
The implementation of tags in MailMate is based on IMAP keywords. This means that the tags are synchronized with the IMAP server if possible. The use of tags in MailMate can be limited by the support of IMAP keywords by the IMAP server. Some servers may have an upper limit on the number of IMAP keywords and some may not support them at all. Feedback is welcome if you have any problems with such limitations.
IMAP keywords only support a subset of ASCII characters. MailMate handles this by maintaining a list of tag names and their corresponding IMAP keywords. The tag names are displayed in the user interface and the IMAP keywords are used when synchronzing with the server. Unfortunately this means that the tag names are not synchronized.
Muting
The “Message ▸ Mute” action is a mailing list oriented feature. When a message is muted it affects all replies for the message arriving in the future. Two actions are taken:
- Replies to muted messages are automatically muted themselves and marked as read.
- If the muted parent is in a different mailbox (for example, because it has been archived or deleted) then the replies are moved to the same mailbox.
The result of this is that a muted message triggers future messages received in the same thread to be handled automatically. The purpose is to more easily follow a high traffic mailing list by letting you decide that you no longer want to see messages in a given thread.
There is an exception though. If a message in the subthread is addressed directly to one of your known identities then the muting is automatically disabled.
This feature is implemented by setting an IMAP keyword named $Muted on muted messages. When a new message arrives, MailMate looks for this keyword in the parent message. Using an IMAP keyword ensures that muting is synchronized between MailMate installations.